We live in a small town where good rentals are so hard to come by. Most of the homes are old (ours was built in 1920) and haven't been updated in a while. You may choose location and good neighbors over space (we only have one, yes, ONE closet in the entire house). Let's just say, we LOVE our location and neighbors...the rest is left to be desired!
It's time to fix that.
I am ready to turn this frown upside-down! I want a place to be proud of whether I own it or not. A series of projects will be underway soon. I will bring you along on this adventure re-creating our living space in our one-closet wonder!
Project Room: The Living Room - BEFORE
*Note: We emptied the room first. Also, the pictures were taken with my son's digital camera since I have
The corner of the room where you would actually walk straight into from the front door (not shown to the far left). The wall color appears golden tan, but it is actually a peachy-tan.
Another view of the west wall.
View into dining room. When we emptied this room, we shoved it into piles in the dining room! The wall blocks the huge mess to the right of the kitchen table!
The east wall where the loveseat once sat. Yes, that's right...loveseat! We will be getting a full-size sofa soon! That is the front door on the right.
Project Room: The Living Room - NEW WALL COLOR
I had the cutest little taping helper.
I chose Glidden's "Icy Teal" for the wall color. It appears slightly brighter than it is because of the flash. It feels more grayish-blue-green in person...really a perfect light teal.
East wall. Paint wasn't completely dry when I snapped this.
I moved the entertainment center by myself! But I was so glad to since it meant I was almost done painting!
Project Room: The Living Room - ENTRYWAY
There is a short wall space as you enter the front door on the left side (basically it is behind the door as it opens), and I thought I would do my best to attempt to make an entryway area there. I purchased a Thomas O'Brien tray with a key image at Target for $9.94 on clearance (75% off) and that was the beginning of my entryway decor. As seen in My Projects, I made a very inexpensive coat rack and just went from there.
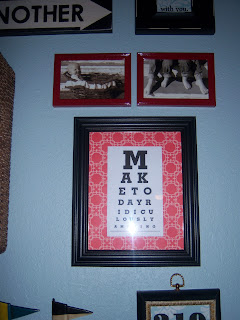
I used several cheap frames and scrapbook paper to create a small gallery wall.
On the top left, I used two wooden plaques I found for $.25 each at a garage sale to display the latitude and longitude coordinates of our house. They had fruit labels on them. I painted them black. The printed the coordinates on card stock and layered it over the red scrapbook paper and mod podged them.
The almost free one-way signs I made were top and center. Then to the right of them was a cute frame I found on clearance at Hobby Lobby for $3.74. I printed the saying on scrapbook paper and framed.
I purchased two wooden 4x6 frames at Target for $1.86 each and spray painted them red. I framed two prints of the boys on the front porch. Then I used a $3.00 black Wal-Mart frame for my custom eyechart (you can make FREE here) and scrapbook paper. It says "Make Today Ridiculously Amazing".
Not a great picture, but the closest one of the lower right frame. I bought the frame at a garage sale for $.25. I printed our address on scrapbook paper and framed.
My $.50 ball jar I found at a garage sale...perfect to empty change out of pockets.
This is a small wooden $.25 box from a garage sale. I just slapped a strip of houndstooth scrapbook paper on the front and a chalkboard label.
Total Spent: $27.00
Break-down (inc. cost of nails or hangers):
Thomas O' Brien basket tray: $9.94
Coat rack: $2.30
Two small black plaques: $.56
One Way Signs: $.40
Small chunky black frame: $3.77
Two 4x6 Target frames: $3.78
Wal-Mart 8x10 frame: $3.03
Black frame with gold loop on top: $.28
Red bucket hanging on #6: $1.00
Ball jar: $.50
Wooden box: $.25
Scrapbook paper, cardstock, and chalkboard labels: $1.25


No comments:
Post a Comment